![AgriNous_RGB_Primary (Mobile).png]](https://support.agrinous.com.au/hs-fs/hubfs/AgriNous_RGB_Primary%20(Mobile).png?height=45&name=AgriNous_RGB_Primary%20(Mobile).png)
Connect a Tru-Test XRP2i Race Scanner to Agrinous on iPhone or iPad
Step 1: Configure the XRP2i Scanner
Step 2 - Turn Bluetooth on on your device.
Step 3 – Connecting the Scanner in Agrinous
Click here to watch a video on how to navigate to the scanning screen in Agrinous
or alternatively follow these steps
Navigate to the sale you wish to scan to from the Agrinous Dashboard.
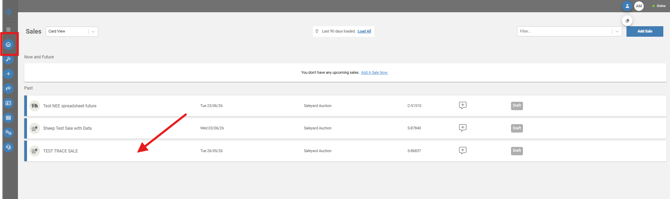
Navigate to the pens tab and select the lot you wish to scan to and select scan.
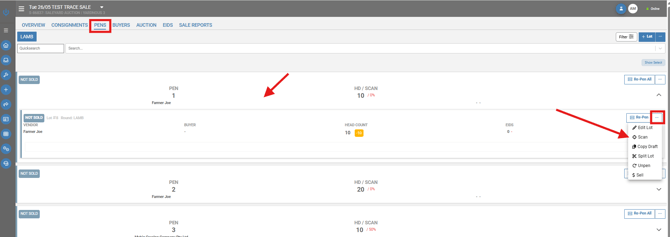
Or alternatively, if scanning to a consignment, select the consignment and select the consignment you wish to scan to and select Scan.
Select real time from the 4 options at the top of the page
A drop-down box will now appear; select the scanner from the drop-down, most likely named XRP2i followed by 6 numbers.(which the 6 digits of the serial number)
Select the device.
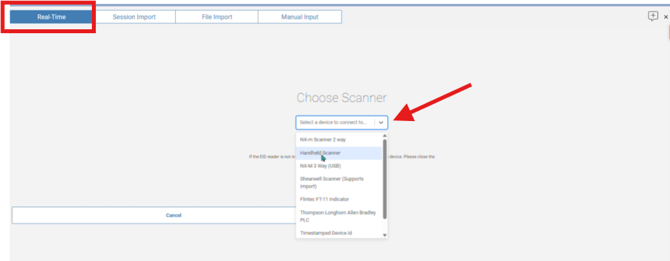
The Agrinous scan screen will now display.
Showing "Disconnect" in blue, this indicates that the scanner is connected.
The blue light on the scanner will also now be illuminated in blue.

Once connected:
The Bluetooth indicator on the race scanner will illuminate. The XRP2i is connected to Agrinous with a solid blue Bluetooth indicator.
Step 4 – Start Scanning
Begin scanning EIDs,
As each tag is read, you will see it drop into the scanning screen, recording the EID against the selected lot in real time. Once all tags are scanned at the bottom of the screen, you can select
Add to sale lot & close OR Add to sale lot and next (if you wish to scan the next pen)
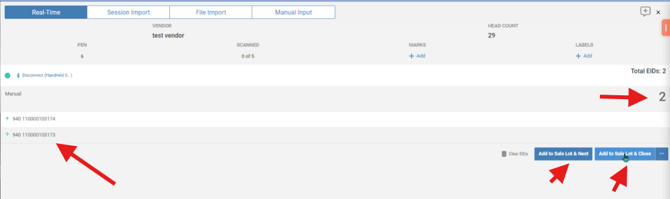
Save the scanned records to your consignment or sale lot.
This guide explains how to connect your Tru-Test XRP2i Race Scanner to the Agrinous iOS app using Bluetooth.
Before You StartBefore connecting your scanner, ensure that:
- The XRP2i Race Scanner is connected to a power source 240v or 12v
- The EID reader panel is securely connected to the XRP2i unit.
- Bluetooth is enabled on your iPhone or iPad.
- The latest version of the Agrinous app is installed.
Step 1: Configure the XRP2i Scanner
On the XRP2i scanner, verify the following settings:
| Setting | Value |
|---|---|
| Bluetooth | Auto |
| Format Type | DEC 1 |
| Tag Reading Output mode | Continous |
| TX Power | HIGH |
| Read Mode | HDX |
Step 3 – Connecting the Scanner in Agrinous
Click here to watch a video on how to navigate to the scanning screen in Agrinous
or alternatively follow these steps
Navigate to the sale you wish to scan to from the Agrinous Dashboard.
Navigate to the pens tab and select the lot you wish to scan to and select scan.
Or alternatively, if scanning to a consignment, select the consignment and select the consignment you wish to scan to and select Scan.
Select real time from the 4 options at the top of the page
A drop-down box will now appear; select the scanner from the drop-down, most likely named XRP2i followed by 6 numbers.(which the 6 digits of the serial number)
Select the device.
The Agrinous scan screen will now display.
Showing "Disconnect" in blue, this indicates that the scanner is connected.
The blue light on the scanner will also now be illuminated in blue.
Once connected:
The Bluetooth indicator on the race scanner will illuminate. The XRP2i is connected to Agrinous with a solid blue Bluetooth indicator.
Step 4 – Start Scanning
Begin scanning EIDs,
As each tag is read, you will see it drop into the scanning screen, recording the EID against the selected lot in real time. Once all tags are scanned at the bottom of the screen, you can select
Add to sale lot & close OR Add to sale lot and next (if you wish to scan the next pen)
Note: After selecting the scanner, the XRP2i display will show "Screen Locked". This is normal while Agrinous configures the scanner's tag format and establishes the Bluetooth connection.
Save the scanned records to your consignment or sale lot.