![AgriNous_RGB_Primary (Mobile).png]](https://support.agrinous.com.au/hs-fs/hubfs/AgriNous_RGB_Primary%20(Mobile).png?height=45&name=AgriNous_RGB_Primary%20(Mobile).png)
Before you start ensure you have:
An Android device with Bluetooth enabled.
The Agrinous Hub app installed.
Download Agrinous Hub:
[Agrinous Hub Download Link]
A Tru-Test XRS2i scanner with the latest firmware.
Latest Tru-Test / Datamars Firmware:
[ Datamars Firmware Link]
Step 1 – Configure the XRS2i Scanner
On the hand held scanner, confirm the following settings:
Bluetooth -Auto
Bluetooth Advanced settings
Connect Mode- Default
Output- Default
Read Mode- Continuous
Tag Reading Format - iOS
Note: Although you're connecting to an Android device, the XRS2i should be configured to use the iOS Tag Reading Format for compatibility with Agrinous.
Step 2 – Enable Bluetooth on Your Android Device
Open your Android device's Settings and ensure Bluetooth is turned on.
Important:
Do not pair or connect the scanner through the Android Bluetooth settings. Agrinous Hub will establish the Bluetooth connection automatically.
Step 3 – Open the Agrinous Hub Click here to see a knowledge base if you require further assistance
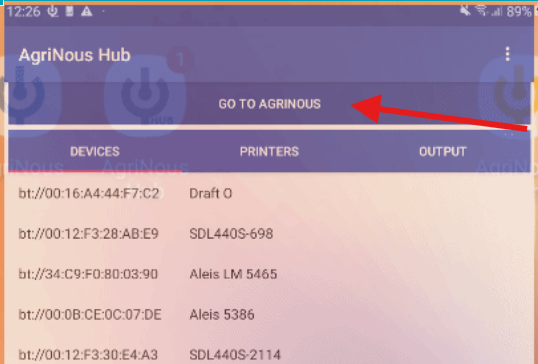
Open Agrinous Hub; once open, you can select "Go to Agrinous" from the hub.
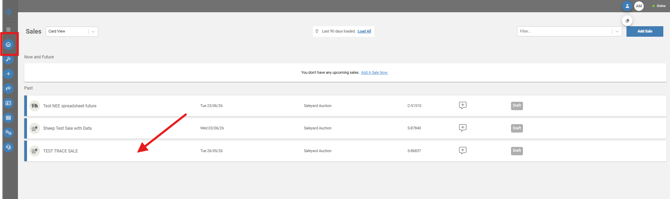
Navigate to the sale you wish to scan to from the Agrinous Dashboard.
Step 4 – Connecting the Scanner in Agrinous
Click here to watch a video on how to navigate to the scanning screen in Agrinous
or alternatively follow these steps
Navigate to the sale you wish to scan to from the Agrinous Dashboard.
Navigate to the pens tab and select the lot you wish to scan to and select scan.
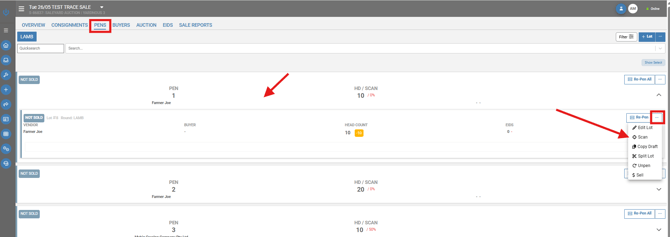
Or alternatively, if scanning to a consignment, select the consignment and select the consignment you wish to scan to and select Scan.
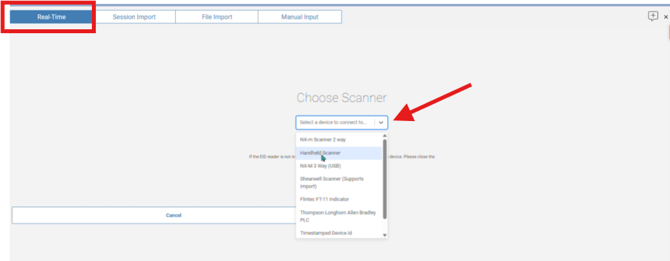
Select real time from the 4 options at the top of the page
A drop-down box will now appear; select the scanner from the drop-down, most likely named XRS2i followed by 4 numbers.
Select the device.
The Agrinous scan screen will now display.
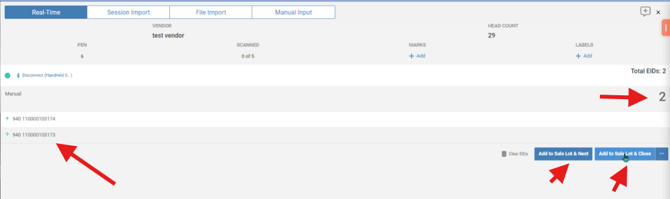
Showing "Disconnect" in blue, this indicates that the scanner is connected.
The blue light on the scanner will also now be illuminated in blue.

Once connected:
The Bluetooth indicator on the hand held scanner will illuminate.
Step 5 – Start Scanning
Simply begin scanning EIDs, by pressing the large black button on your handheld scanner.
As each tag is read, you will see it drop into the scanning screen, recording the EID against the selected lot in real time. Once all tags are scanned at the bottom of the screen, you can select
Add to sale lot & close OR Add to sale lot and next (if you wish to scan the next pen)
Troubleshooting
Scanner doesn't appear
Ensure Bluetooth is enabled on your Android device.
Confirm the scanner is powered on and charged.
Check the scanner is configured using the settings listed above.
Restart Agrinous Hub if required.
Scanner won't connect
Make sure the scanner has not been paired through the Android Bluetooth settings.
If it has, forget/remove the device from Bluetooth settings and reconnect through Agrinous.
Bluetooth light isn't on
The scanner is not connected to Agrinous.
Return to Scan, Real Time and select the scanner again from the available devices.
Connection keeps dropping
Ensure the scanner remains within Bluetooth range.
Confirm both the scanner firmware and Agrinous Hub are up to date.
Success
When connected correctly:
The scanner's Bluetooth light remains on.
A blue Disconnect button appears within Agrinous.
Tags scan directly into the selected lot without any manual import.
Your Tru-Test XRS2i is now ready for real-time scanning with Agrinous.